This shop has been compensated by Collective Bias, Inc. and its advertiser. All opinions are mine alone. #LunchesWithLove #PackedWithLove #CollectiveBias

Back to school season is upon us and I love to send my kiddos off to school with a lunchbox packed with love. I recently made a couple of lunchboxes and today I’m sharing my DIY lunchbox tutorial along with some of the things I like to pack inside them.
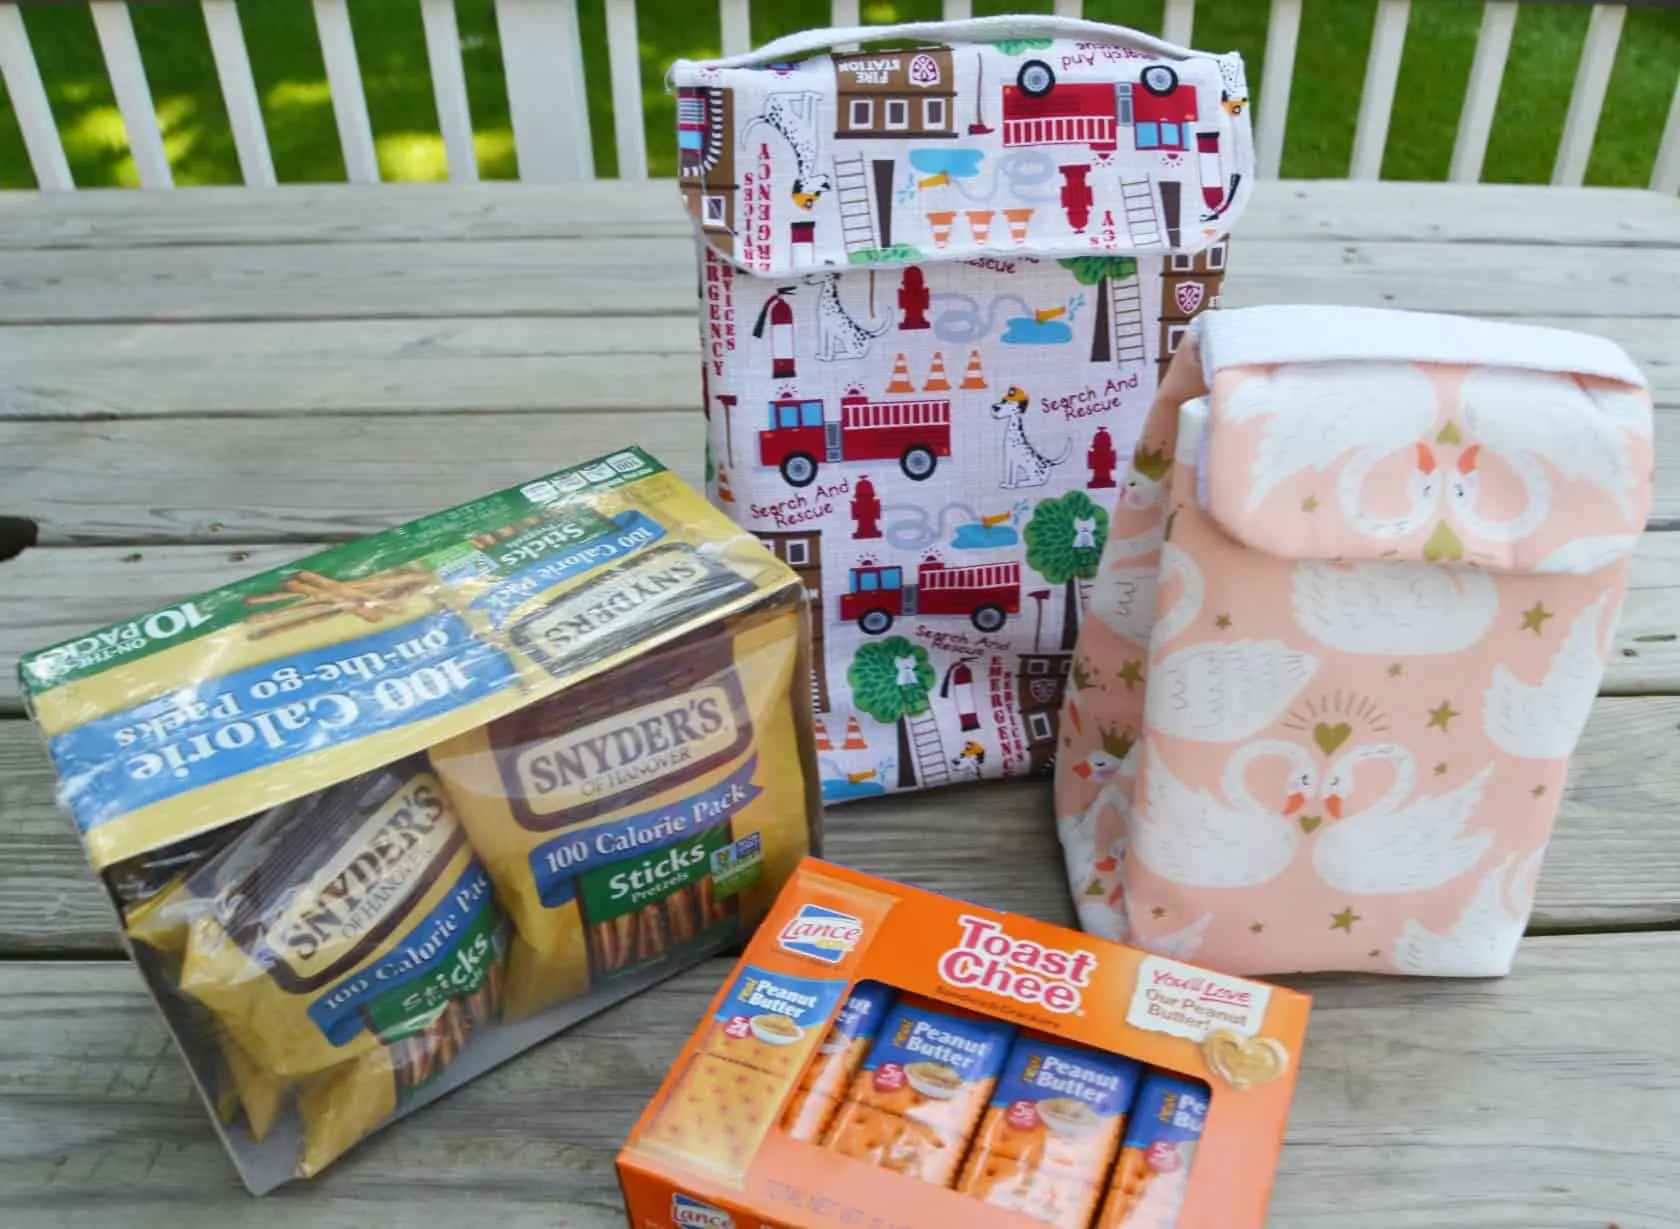
To get ready for heading back to school I recently dropped by my local Giant Eagle to stock up on some of our lunch box staples. I picked up some Lance Sandwich Crackers and some Snyder’s of Hanover lunch packs.
My son picked out some Lance Toast Chee crackers. He loves the combo of the cheese crackers and the real peanut butter. I love that they have no high fructose corn syrup and they are a wholesome snack. With 5g of protein there are a perfect, filling snack for after school or between activities.
I remember eating these as a little girl and having been around for almost a century they truly are an iconic snack.
 We also grabbed some Snyder’s of Hanover Sticks lunch packs. Each pack contains 10 perfectly portioned 100 calorie packs of pretzels made with unbleached flour in a peanut-free facility.
They are also non-GMO Project verified. Snyder’s of Hanover has been America’s pretzel bakery since 1909 and they continue to provide a variety of quality, wholesome snacks made from simple ingredients that deliver a delicious crunch.

Be sure to look for an offer in your weekly circular for a chance to save on Snyder’s of Hanover and Lance products starting 7/29/18 until 9/30/18.
- Save $1.00 on ANY 2 Lance Sandwich cracker or peanut multipack 8 oz or larger
- Save $1.00 on ANY 2 Snyder’s of Hanover products 5 oz or larger
Also be sure to enter The Back to School Mega Event Sweepstakes! You can enter from 7/16/18 to 8/26/18. Each prize will be packed with love in a lunchbox (except the scholarship check and laptop which will shop separately).
The weekly prizes include:
- Grand Prize- $2,500 scholarship
- First Prize- Laptop
- Second Prize- Tablet
- Third Prizes- $50 gift cards for school supplies
- Fourth Prizes- Swag such as a robot keychain, chip clips, can cooler, or thermos

 NO PURCHASE NECESSARY. VOID WHERE PROHIBITED. LIMIT ONE (1) PRIZE PER PERSON. The Sweepstakes begins 7/16/18 at 12:00:01 AM ET and ends 8/26/18 at 11:59:59 PM ET. Open only to eligible legal 50 US/DC residents who are 18 years or older and the age of majority. Subject to Official Rules available at www.bettersnackingforyou.com. See Official Rules for daily entry instructions, odds of winning, prize details, restrictions, etc. There are ninety (90) prizes available. The total approximate retail value of all prizes to be awarded is $23,238. Odds of winning depend on the number of eligible entries received. Sponsor: S-L Snacks National, LLC, 13515 Ballantyne Corporate Place, Charlotte, NC 28277. Administrator: US Sweepstakes & Fulfillment Co., 625 Panorama Trail, Suite 2100, Rochester, NY 14625.

DIY Lunch Box Tutorial
To Make a DIY Lunch Box You Will Need:
- ½ yard of woven cotton fabric for the outside of the lunch box
- ½ yard of insulated batting
- ½ yard of laminated cotton fabric for the inside of the lunch box
- ¼ yard of cotton webbing
- ¼ yard of sew-on velcro
- coordinating thread
- rotary cutting set or scissors
- sewing machine
- heavy duty needles for the sewing machine
- pins
Step 1: Take your insulated batting. Cut out a square measuring 12 inches X 12 inches and a rectangle measuring 16 inches X 12 inches. [Note: these measurements make the swan lunch box pictured. To make a bigger one like the fire dog one then add 2 inches to the height of each piece.]
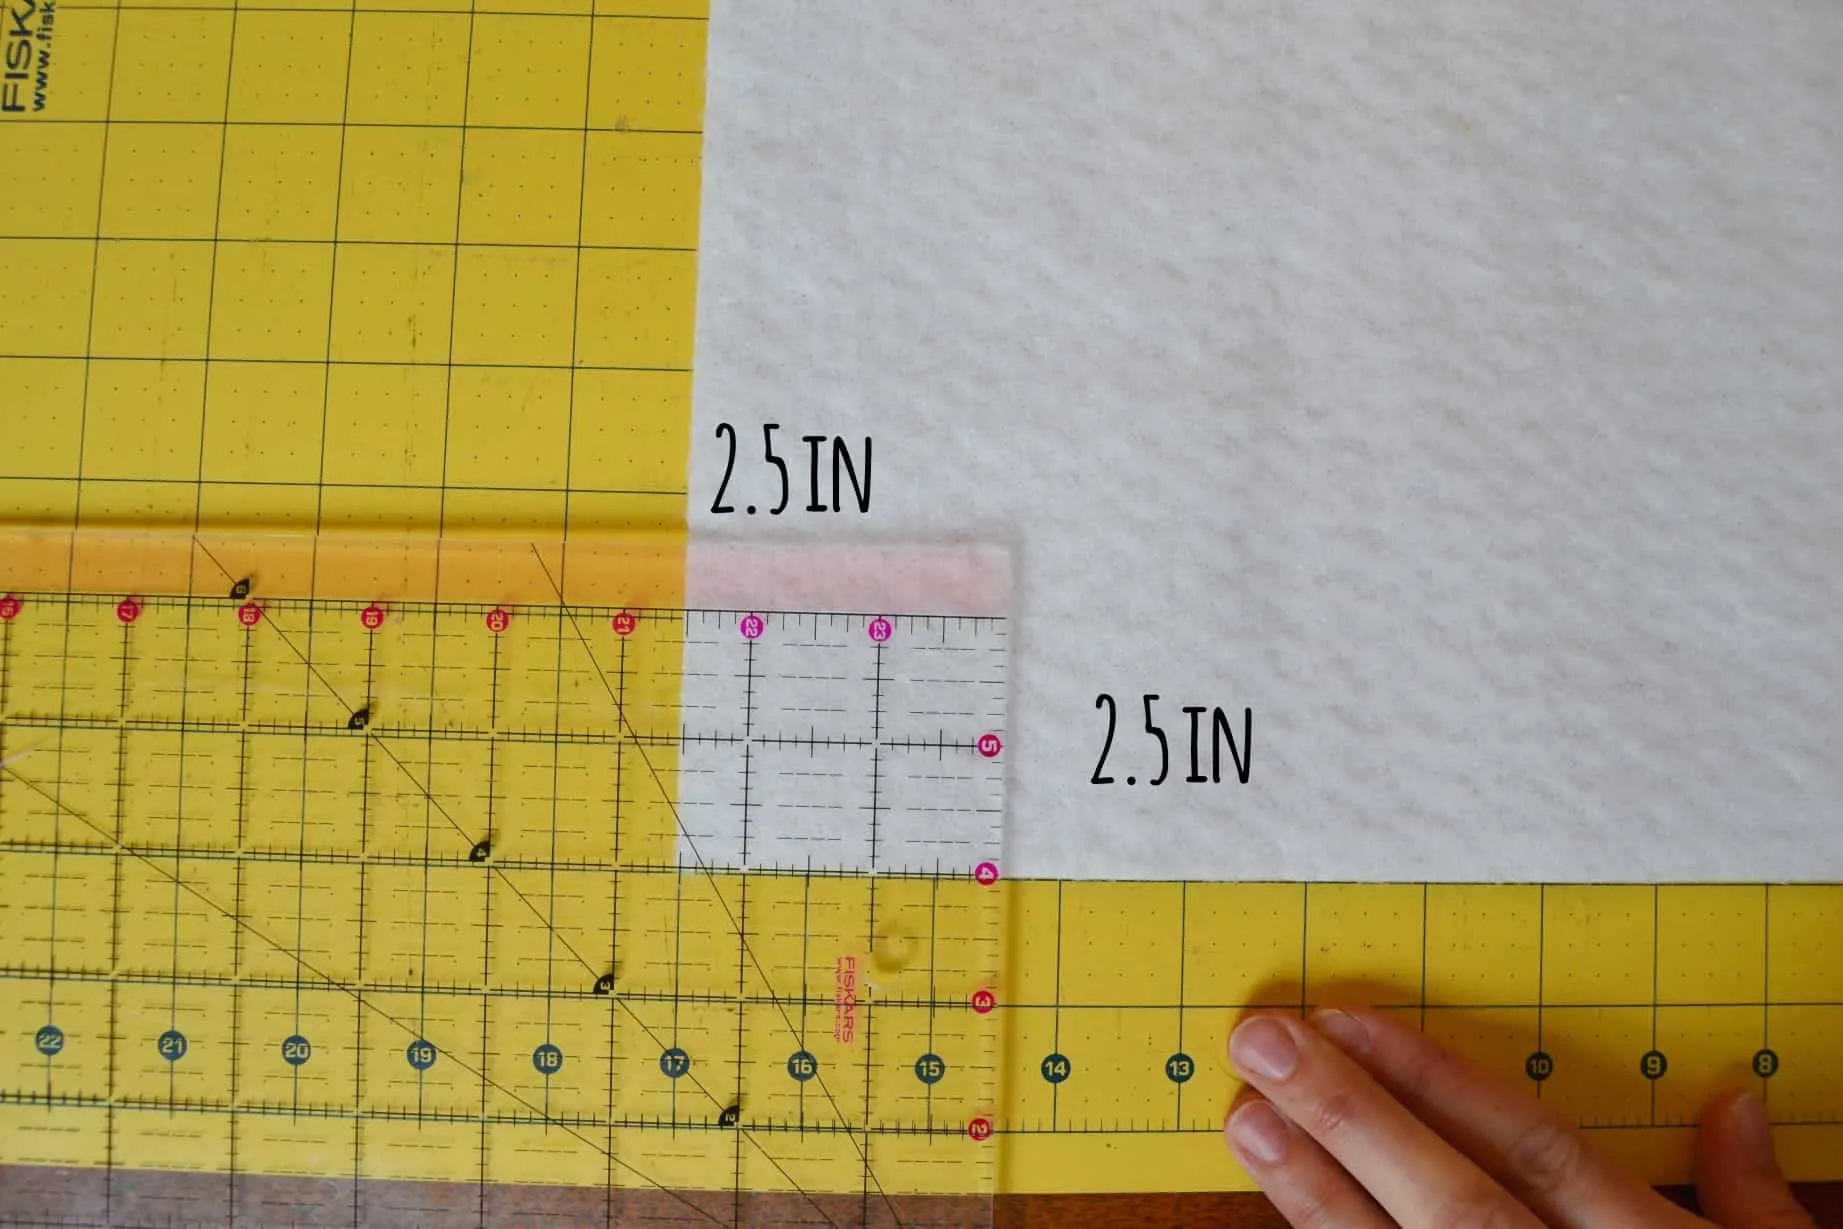
 Step 2: Cut a 2.5 inch square out of the bottom left and bottom right corner of the 12 in X 12 in square. Do the same for the rectangle.
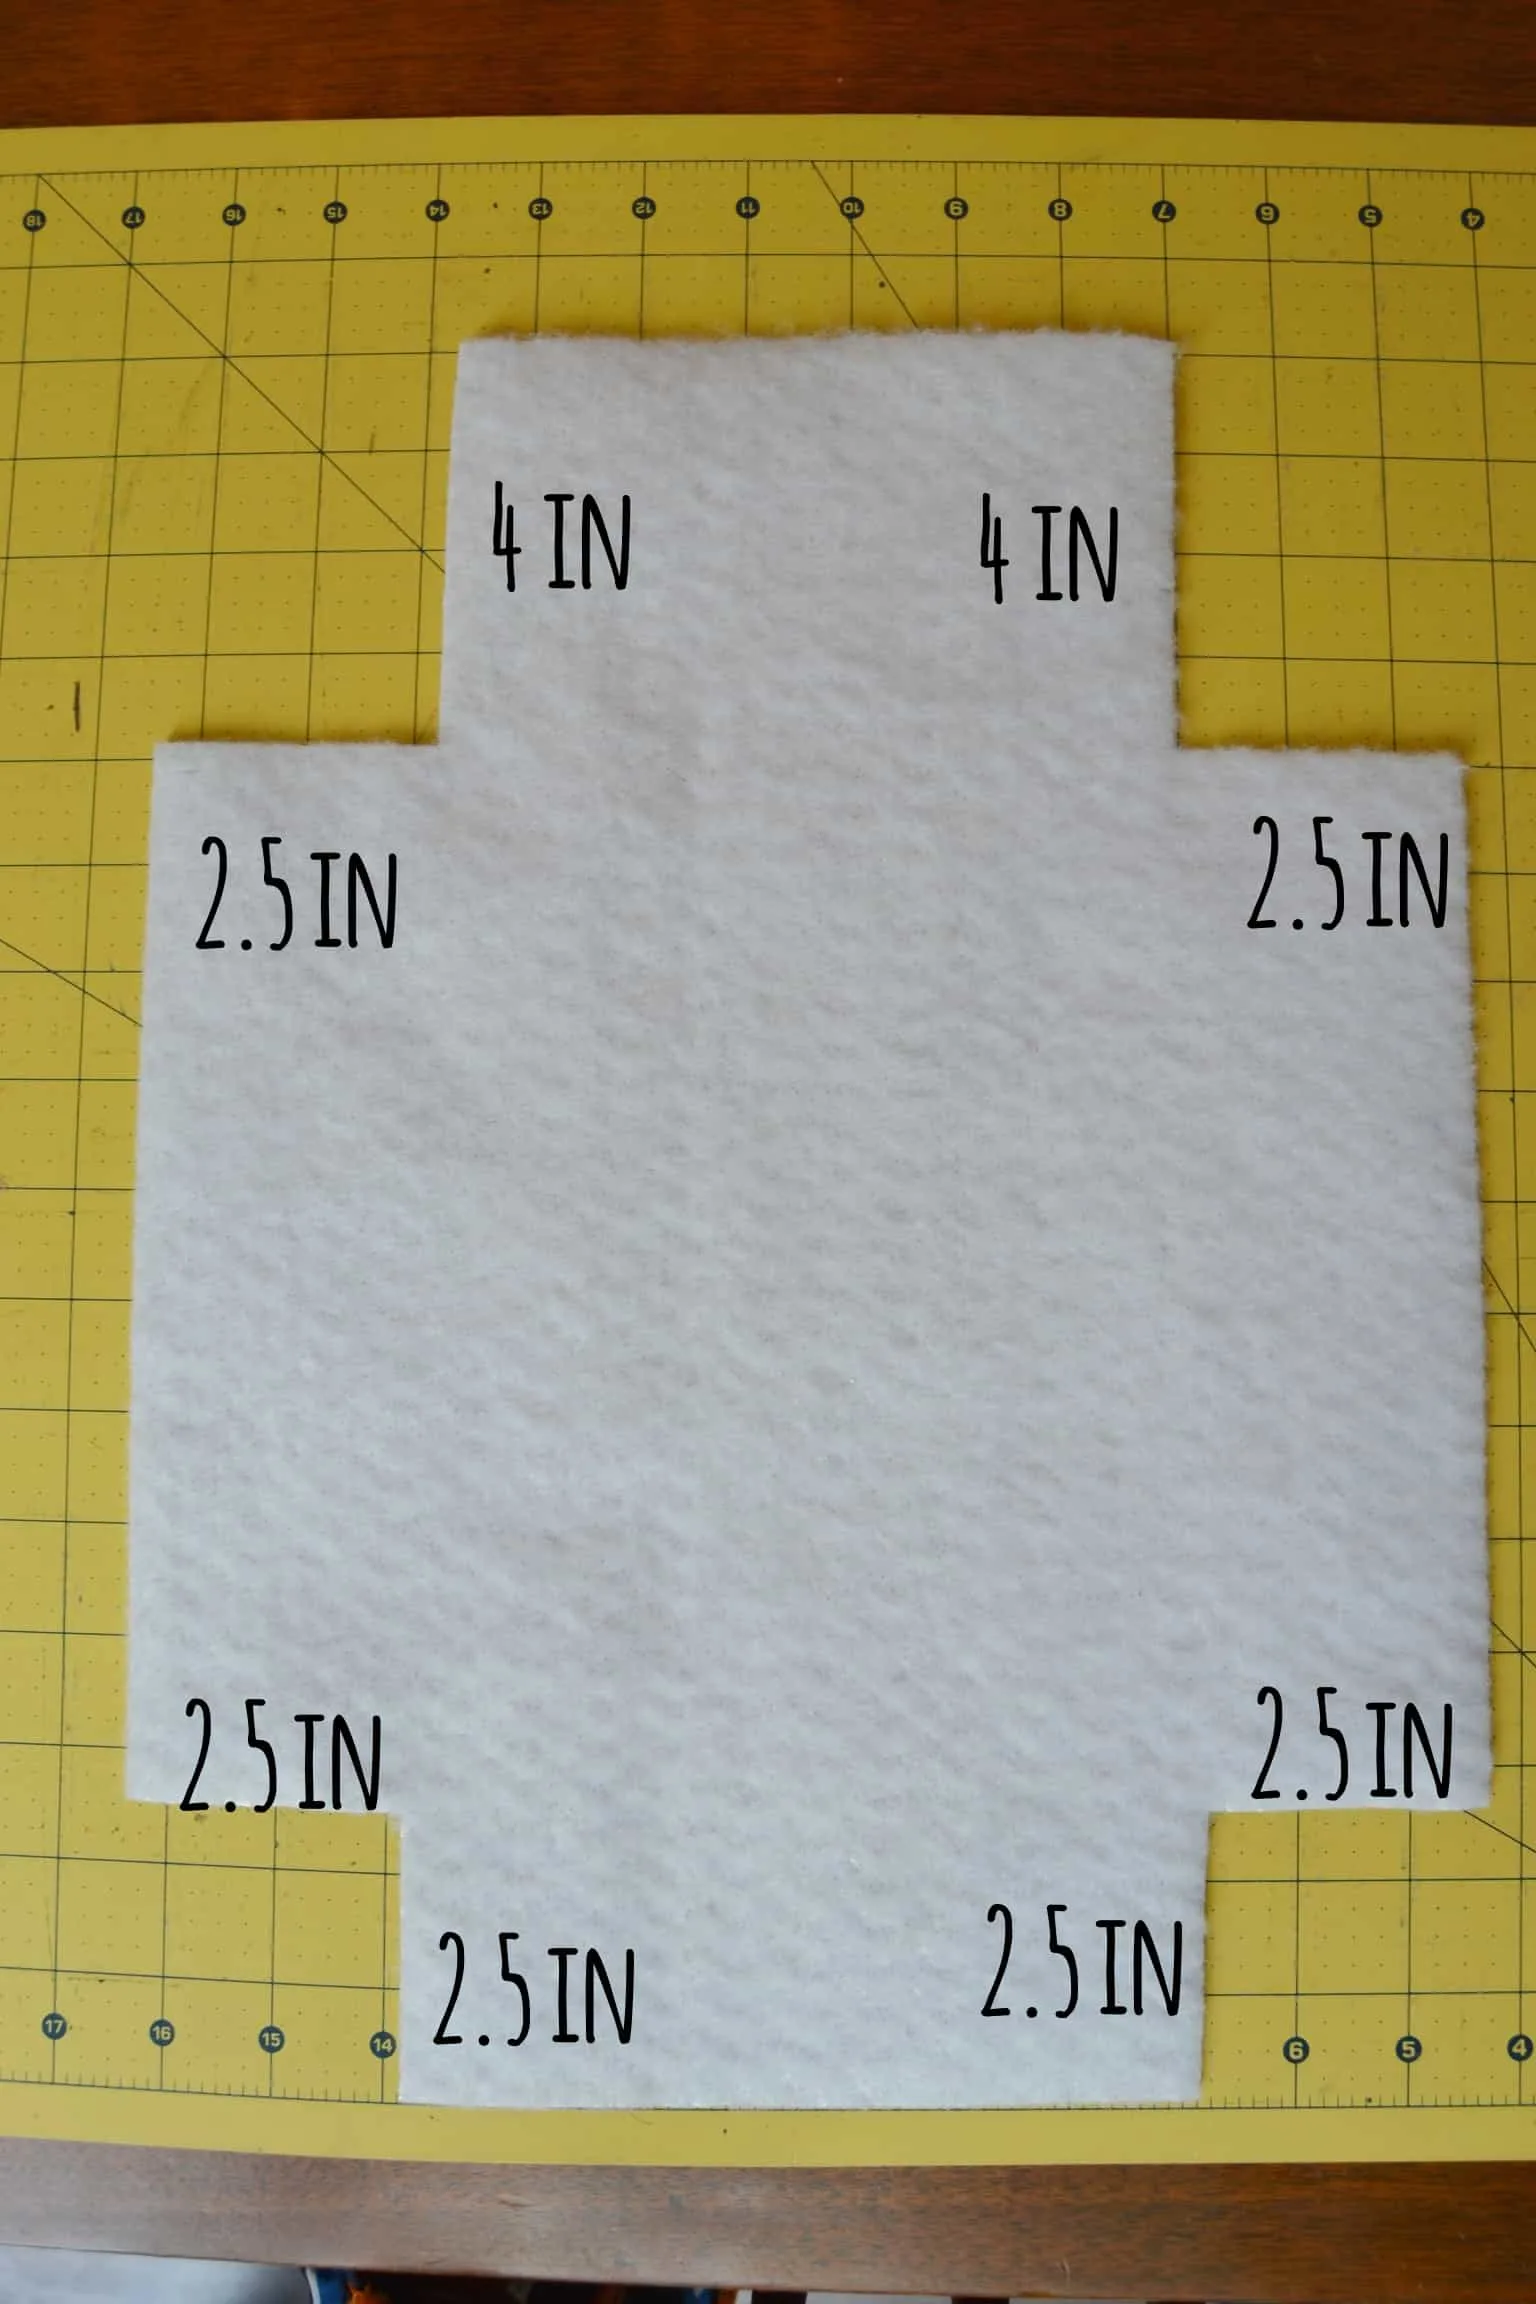
 Step 3: For the rectangle you will cut out the top right and left corners as well BUT you will cut out a rectangle measuring 2.5 inches X 4 inches. The picture below shows it best.
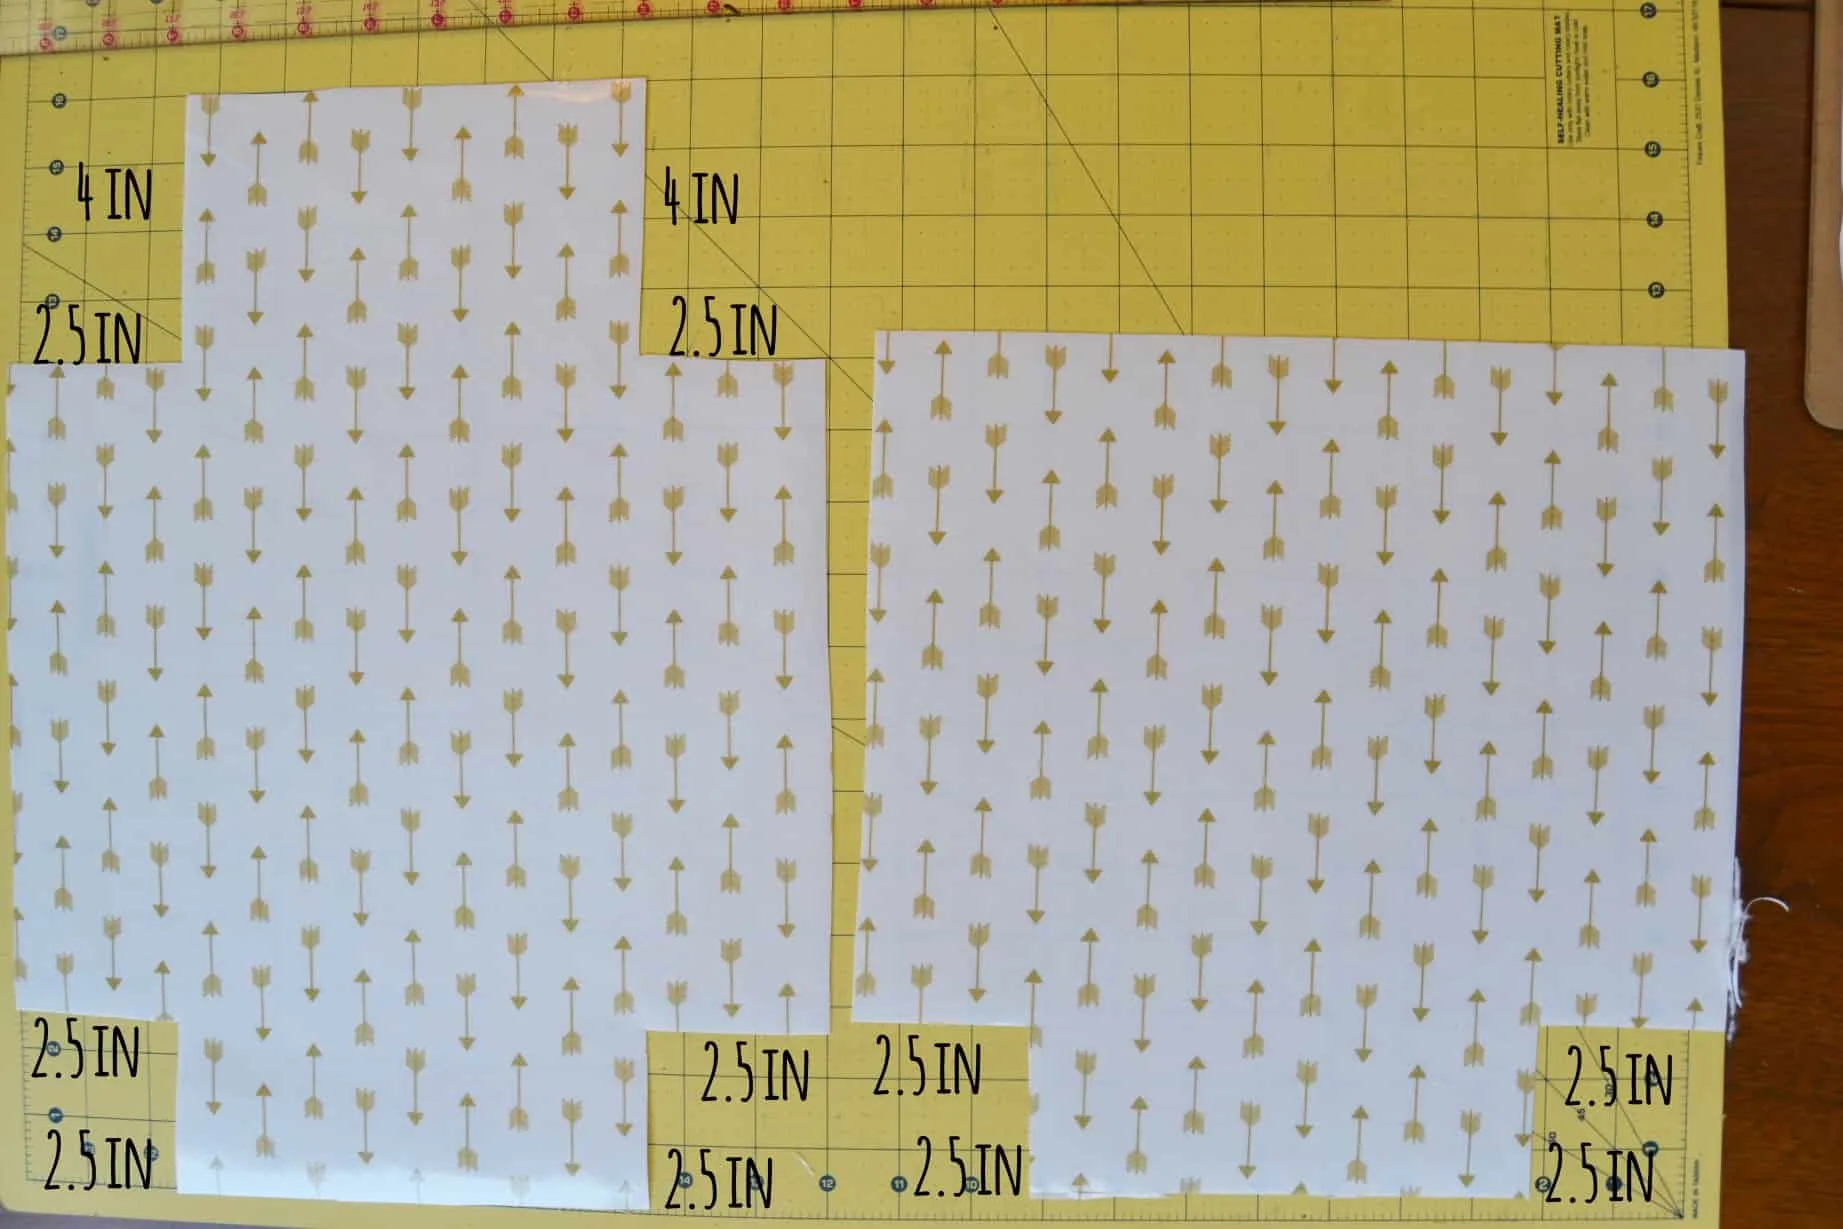
 Step 4: Repeat steps 1-3 with the vinyl and the cotton fabric so that you end up with the same two shapes out of those two fabrics.
 Step 5: Now you are going to make a stack. Lay down your bigger piece of batting with the bigger piece of cotton fabric on top of it, with the right side up. Cut a 7 inch piece of the cotton webbing and lay it across the top of the cotton fabric, just above the area where the wider middle section is. Pin and sew it into place.

 Step 6: Now take your smaller piece of insulated batting and make a stack by placing your cotton fabric on top of it with the right side up. Cut a piece of velcro to 5 inches. Place one side of it about an inch and a half from the top in the center. Pin and sew it into place.
 Step 7: Take the big piece of vinyl and position your other half of the velcro piece so that it is about 1.5 inches from the top of the longer piece (where you cut out the 2.5 X 4 inch rectangle) and centered. Pin and sew it into place.
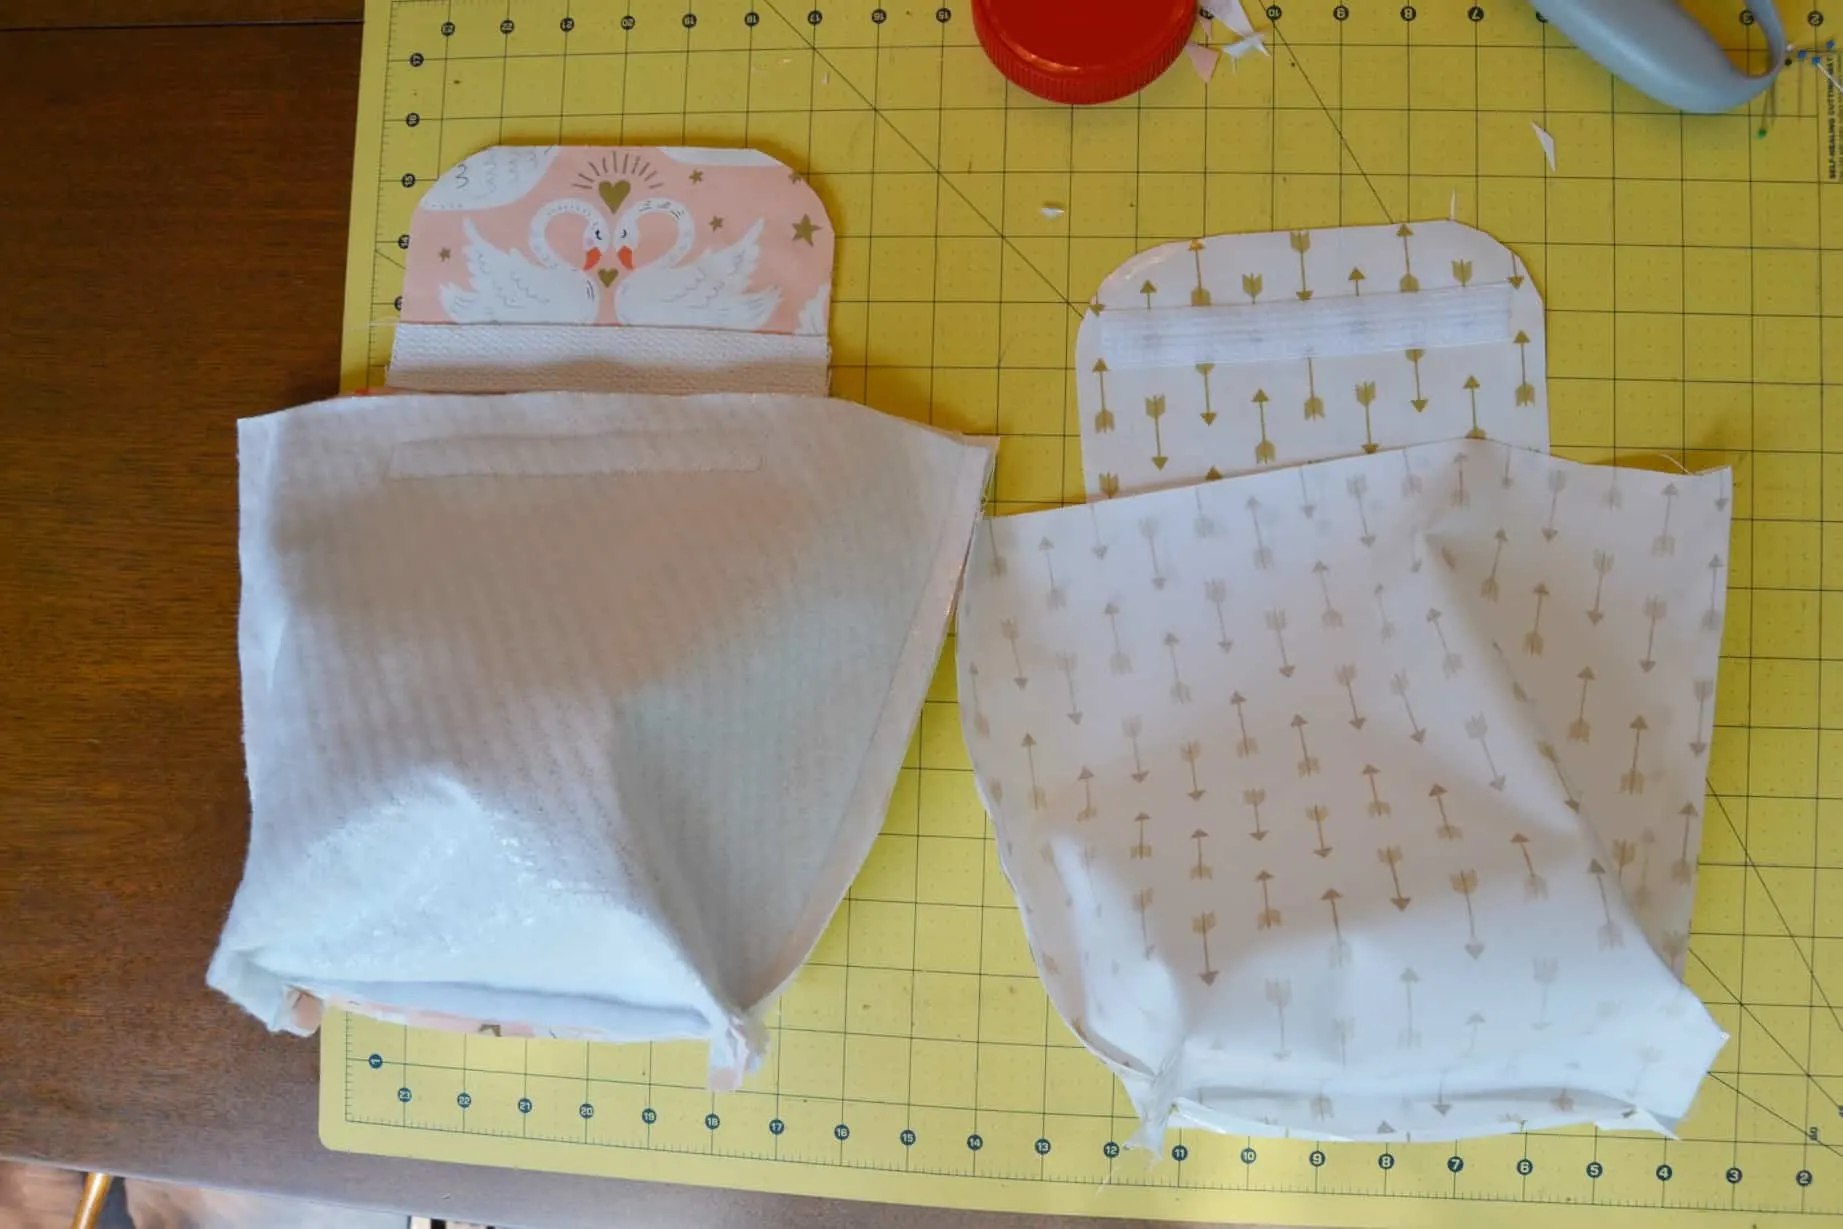
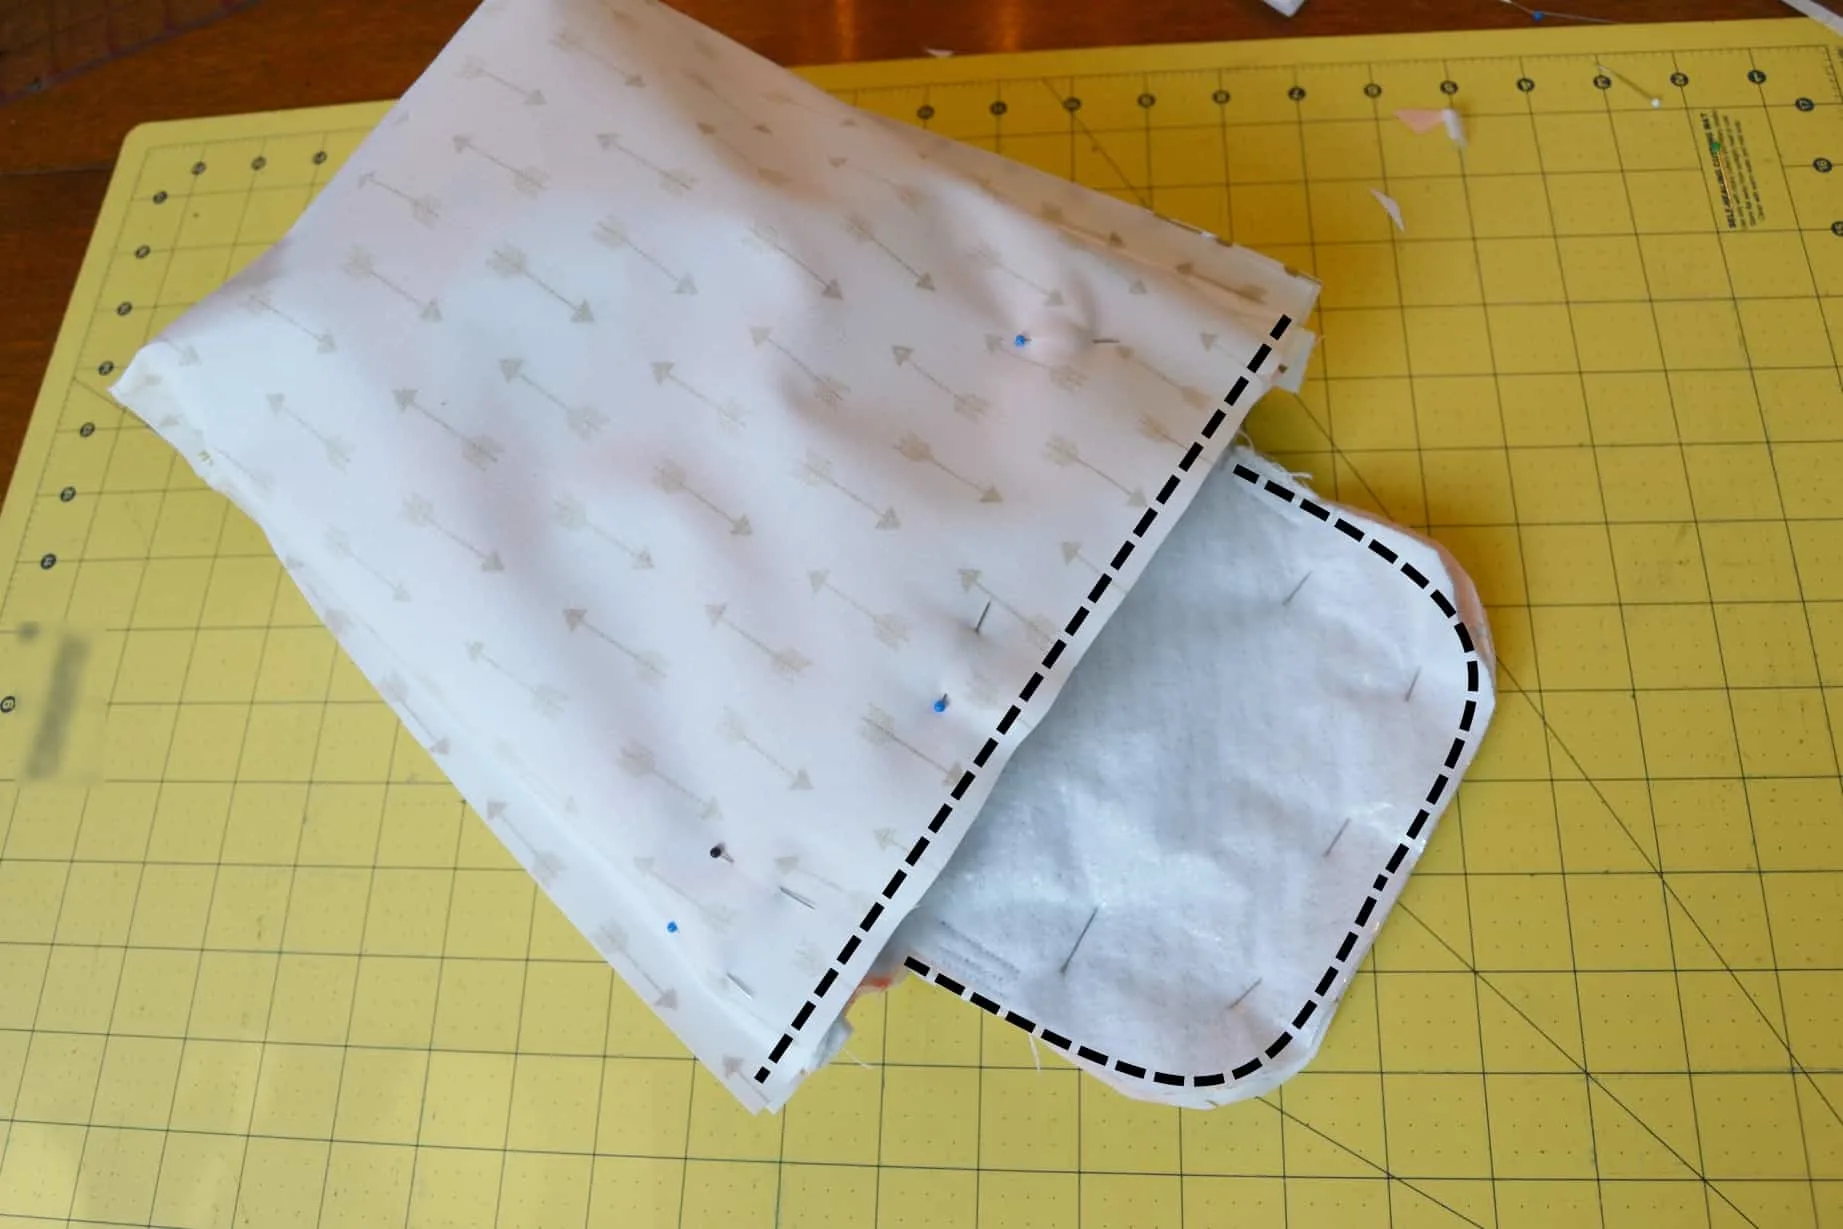
 Step 8: Now we are going to make some more stacks. Take your big vinyl piece and lay it down with the right side up. Lay the smaller piece of vinyl on top of it with the right side down. (This is the stack on the left in the picture below)

Take your big cotton fabric/insulated batting piece and lay it down with the right side up. Lay the smaller cotton fabric/insulated batting piece down on top of it with the right side down. (This is the stack on the right in the picture above)
Pin and sew along the lines you see in the picture below, sewing ½ inch from the edge. On the vinyl one make note of the hole that you are going to leave in the one side.
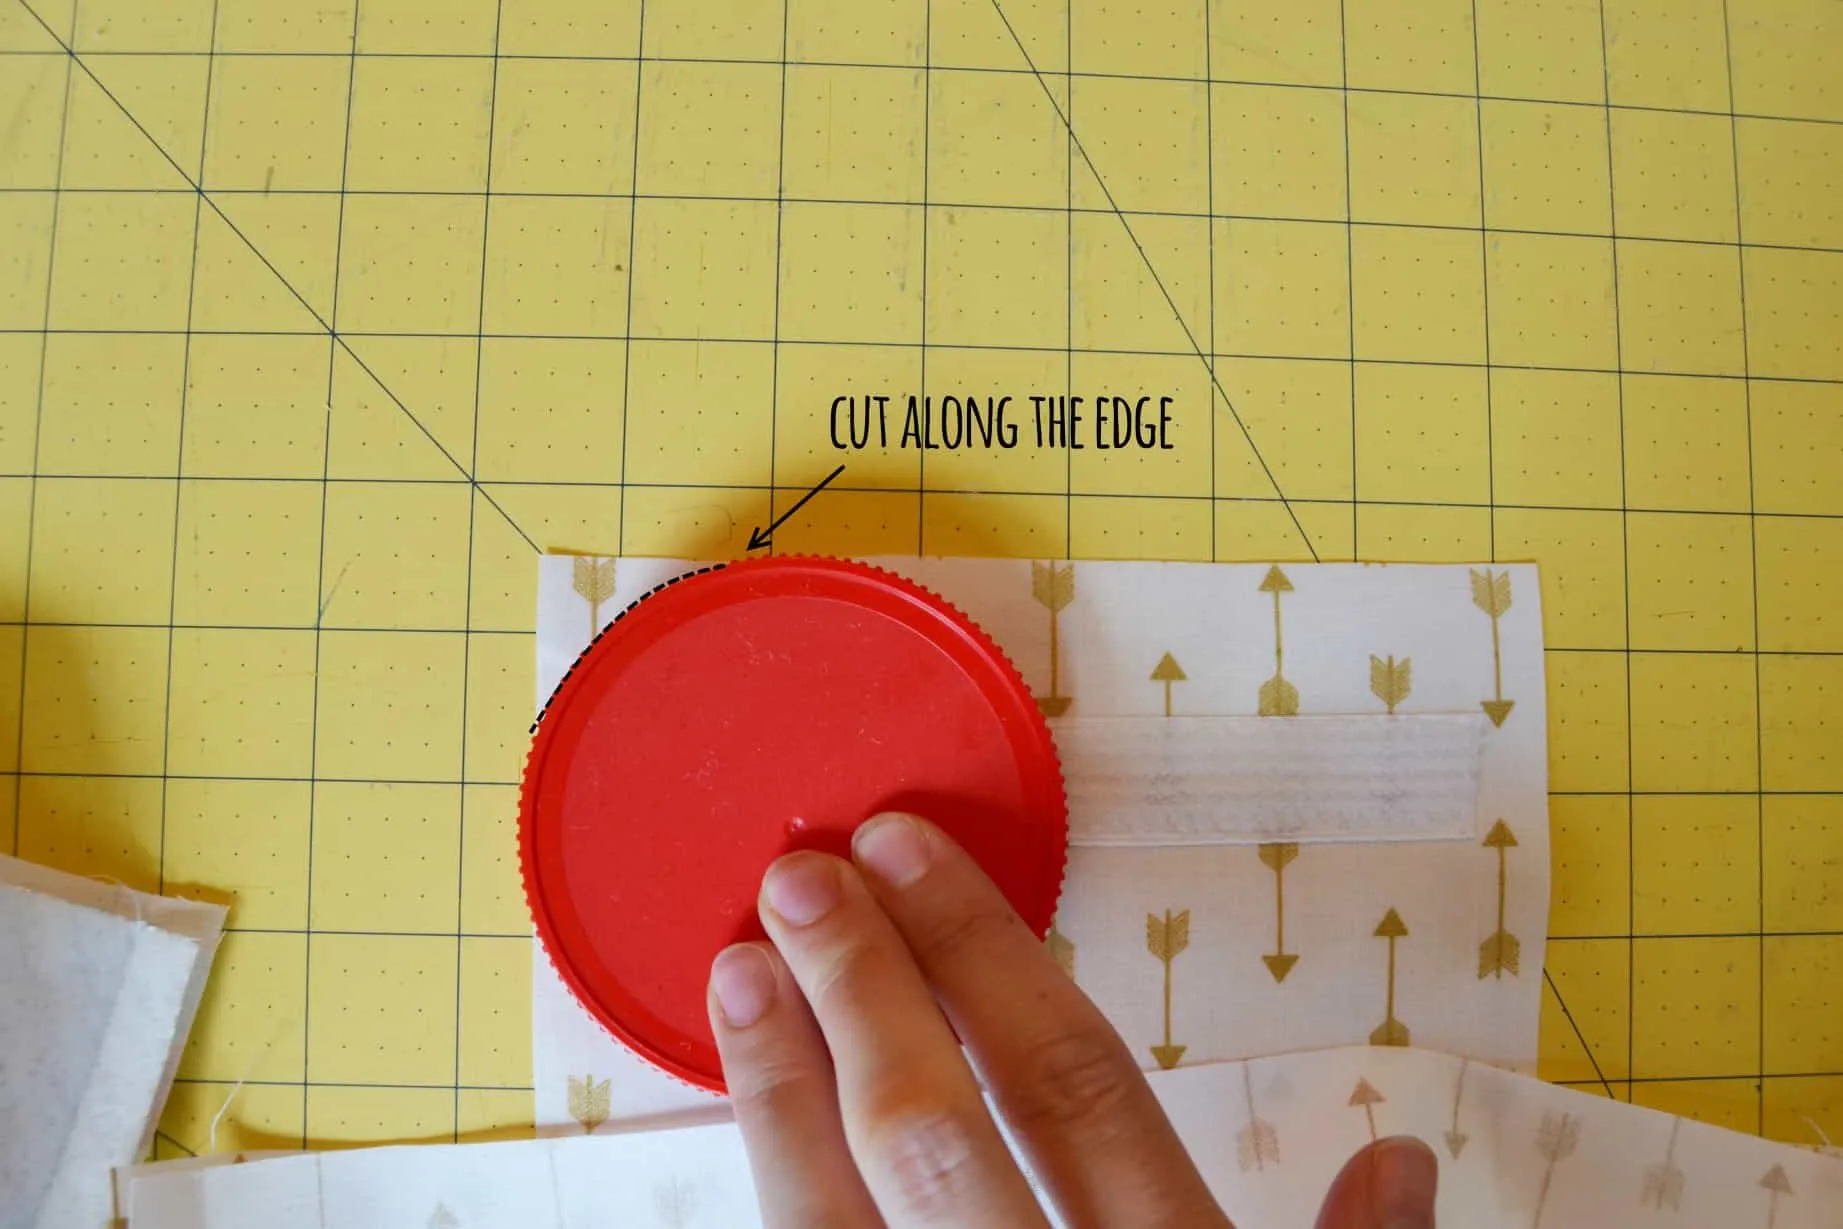
Step 9: Use something round (like the lid of a jar) to round off the top edges of the flap at the top of each stack.


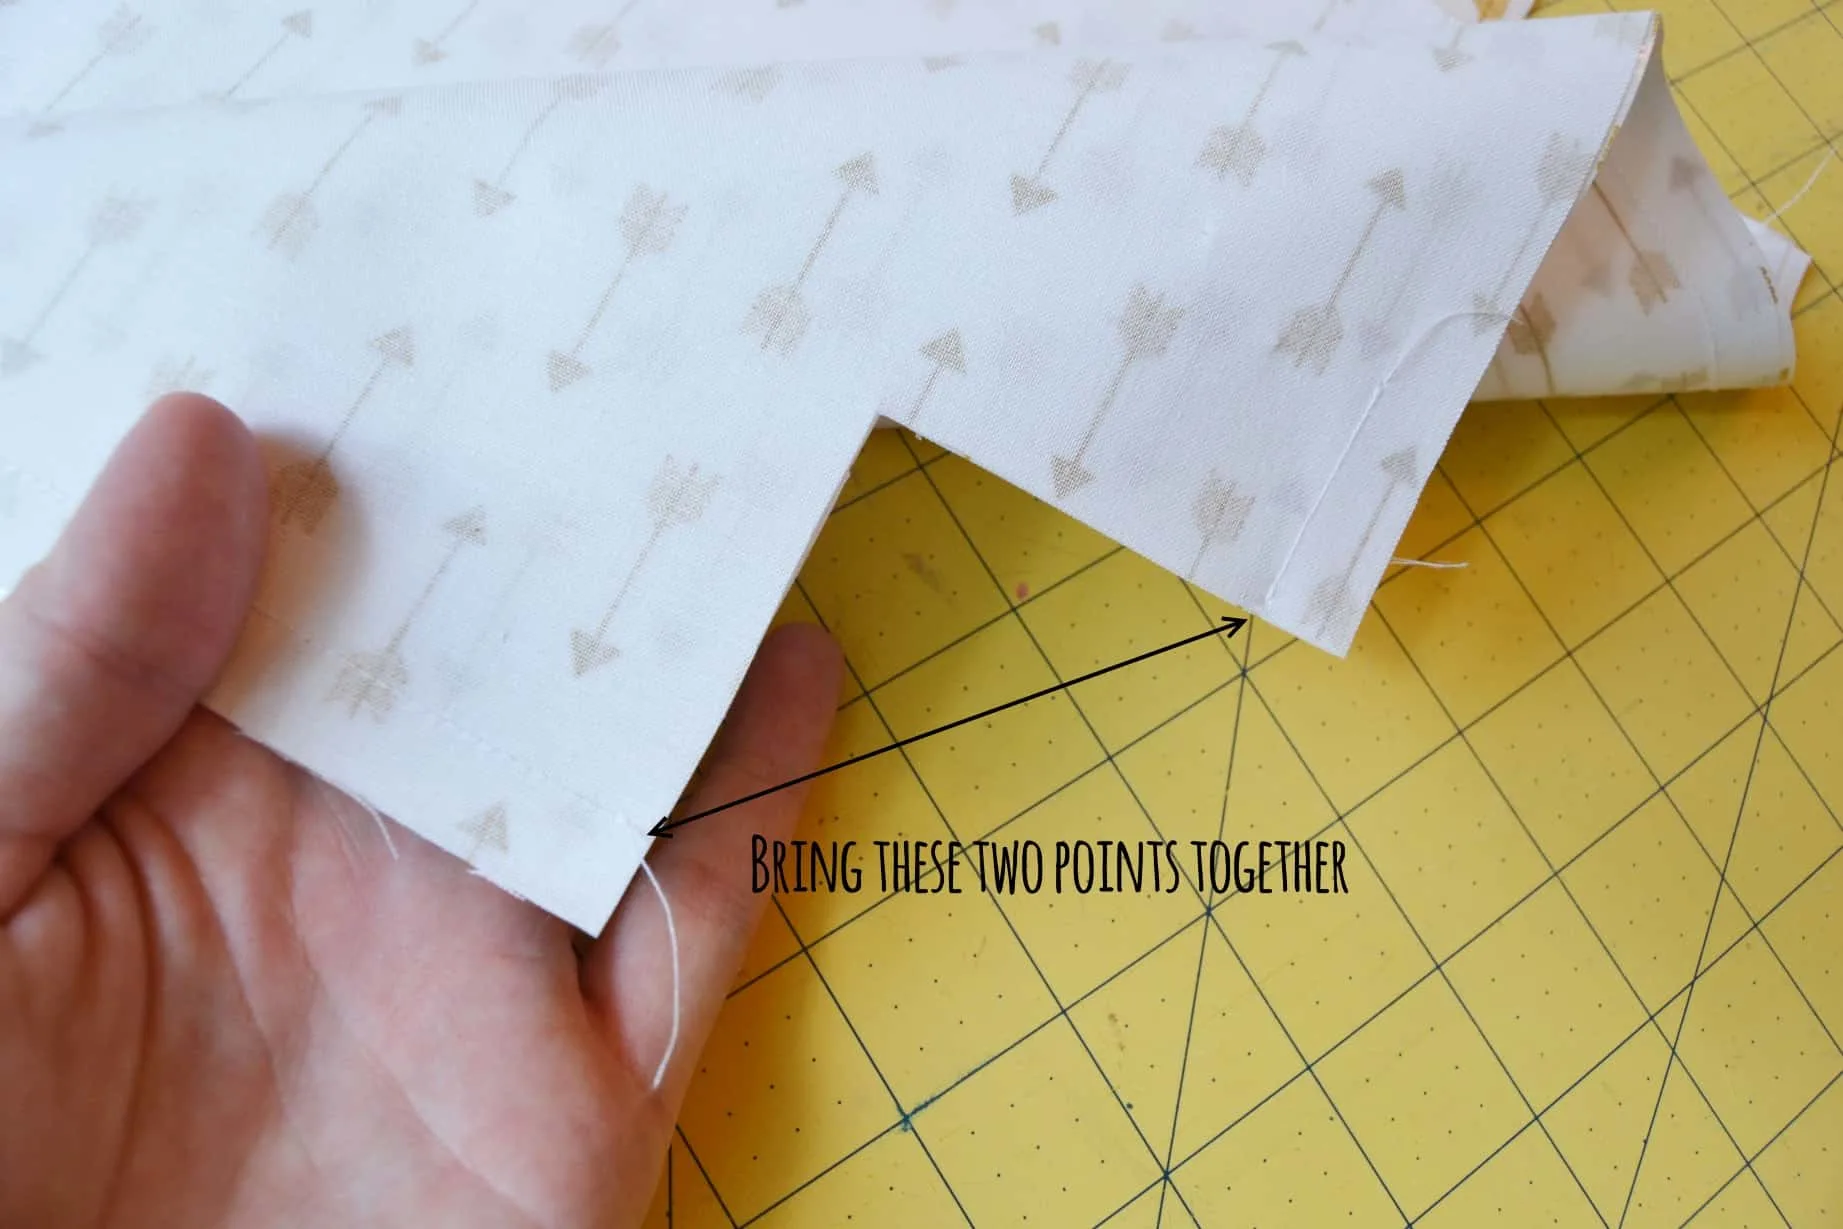
 Step 10: Once you’ve sewn the lines you will have the two unsewn areas at the bottom corners. Open your stack up and pinch the two seams together. Pin and sew across this area, sewing ½ inch from the edge.
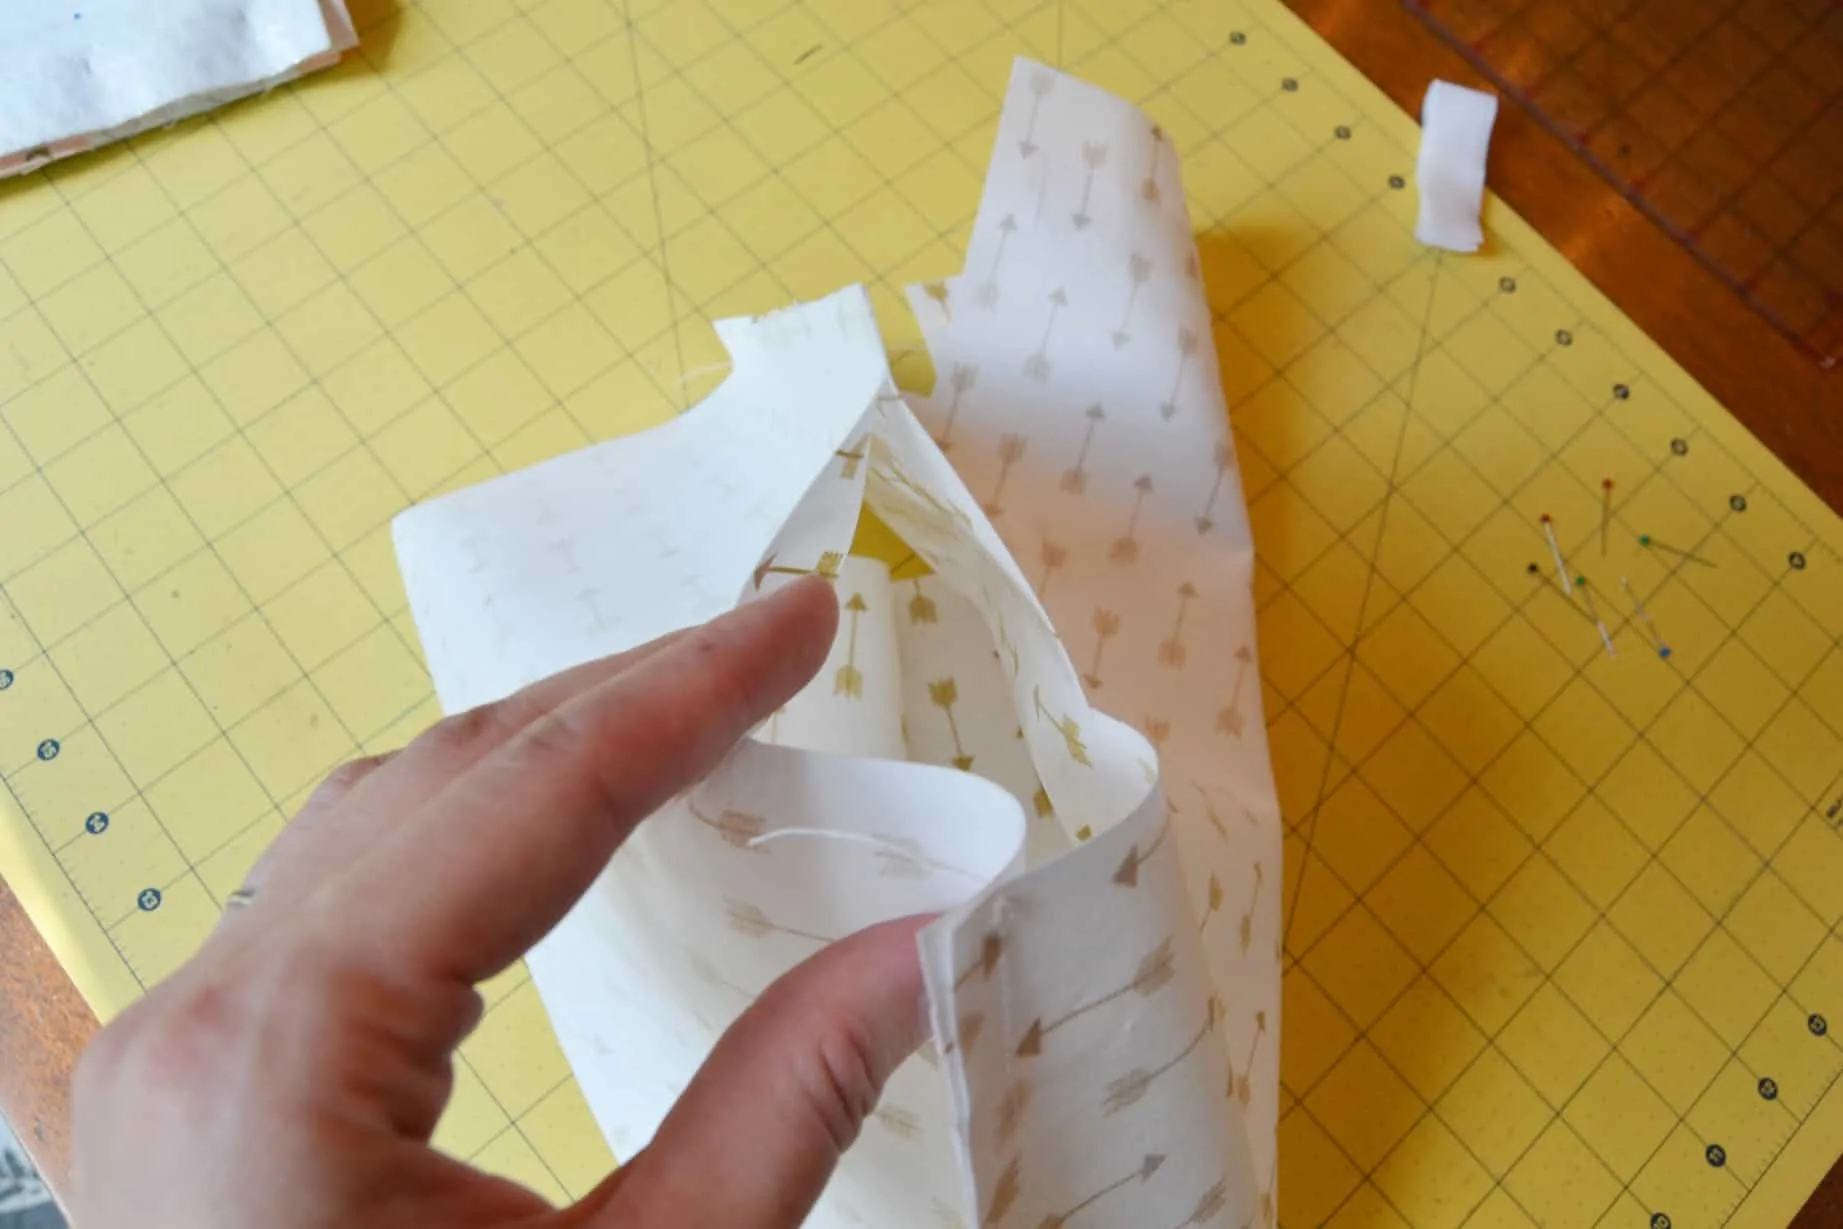

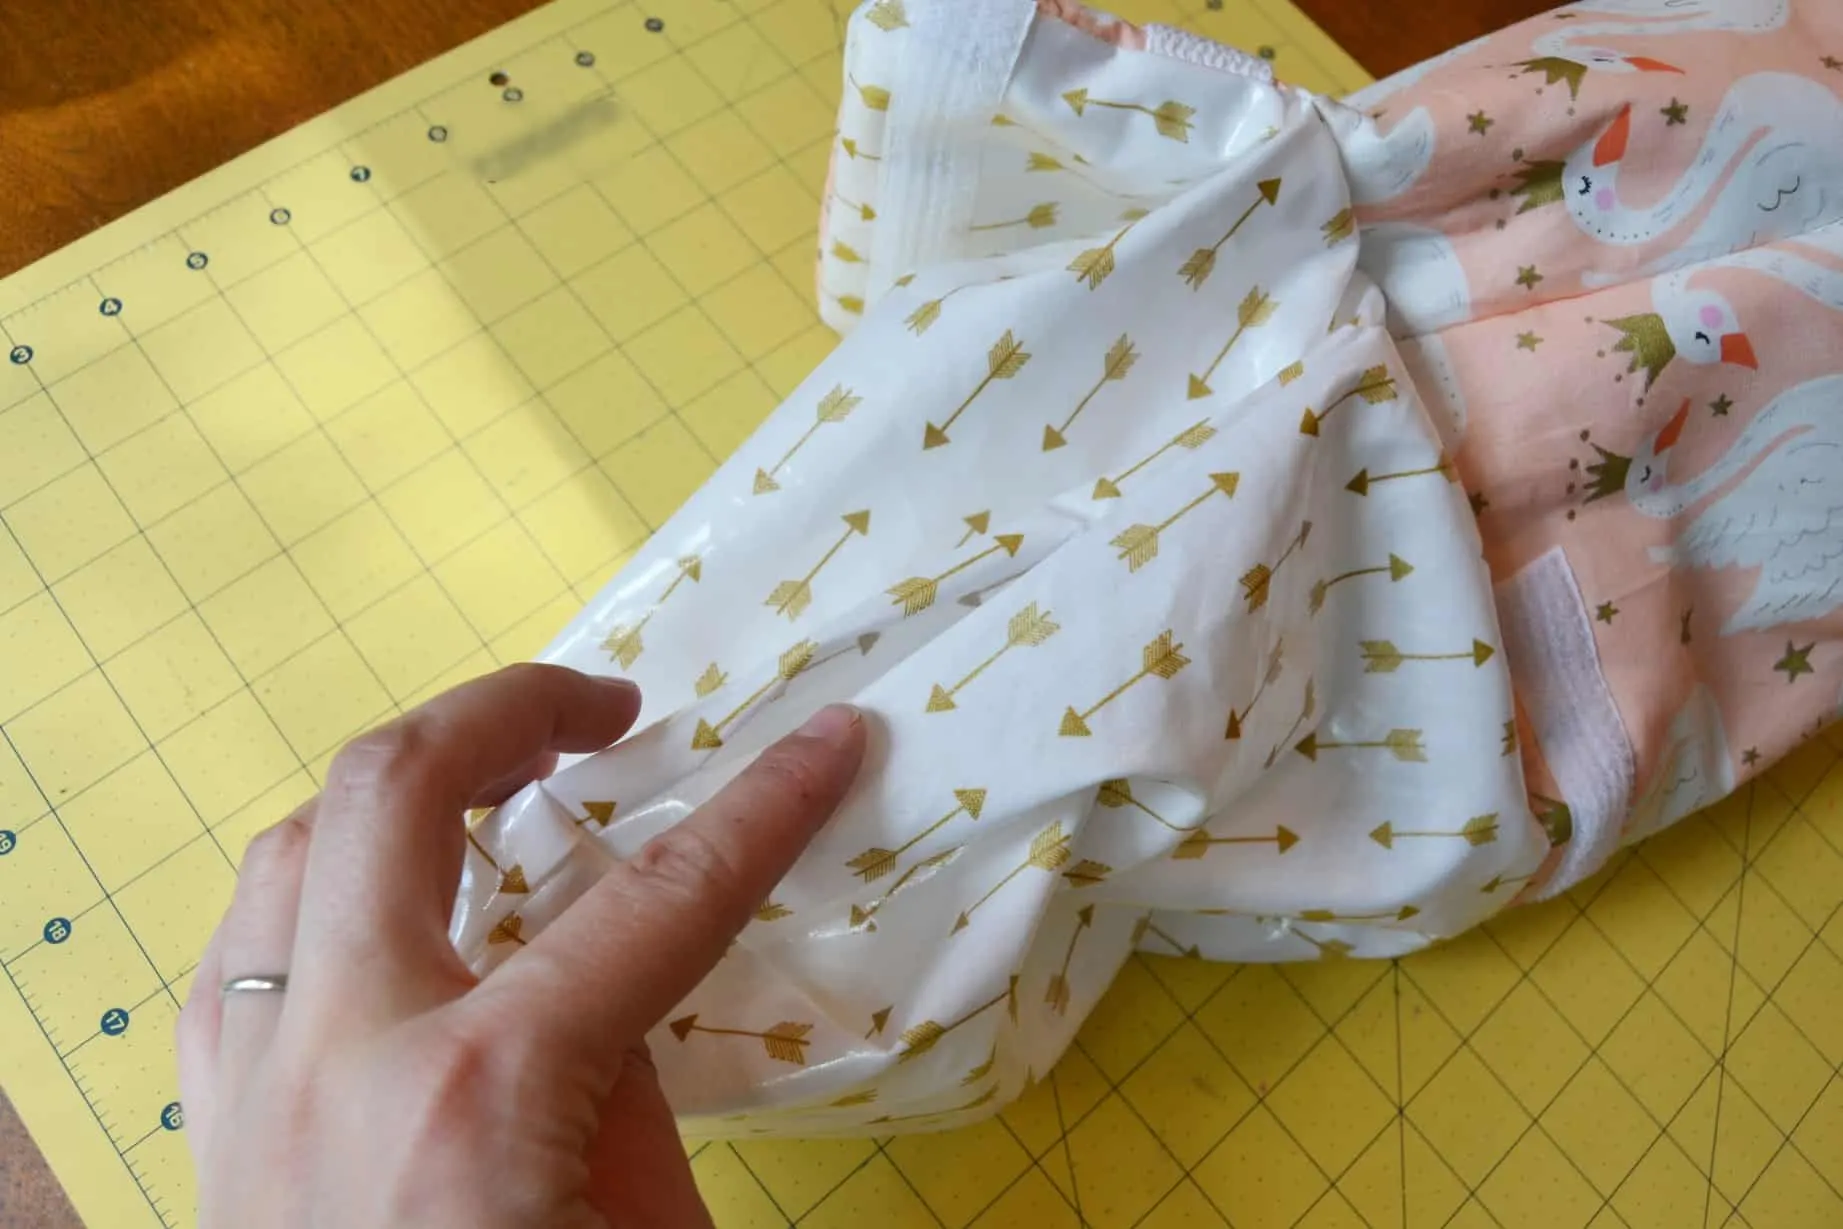
 Step 11: Now you have two bags, basically. Turn the cotton fabric/insulated binding one right side out. Then place the cotton fabric/insulated binding one inside of the lining one.

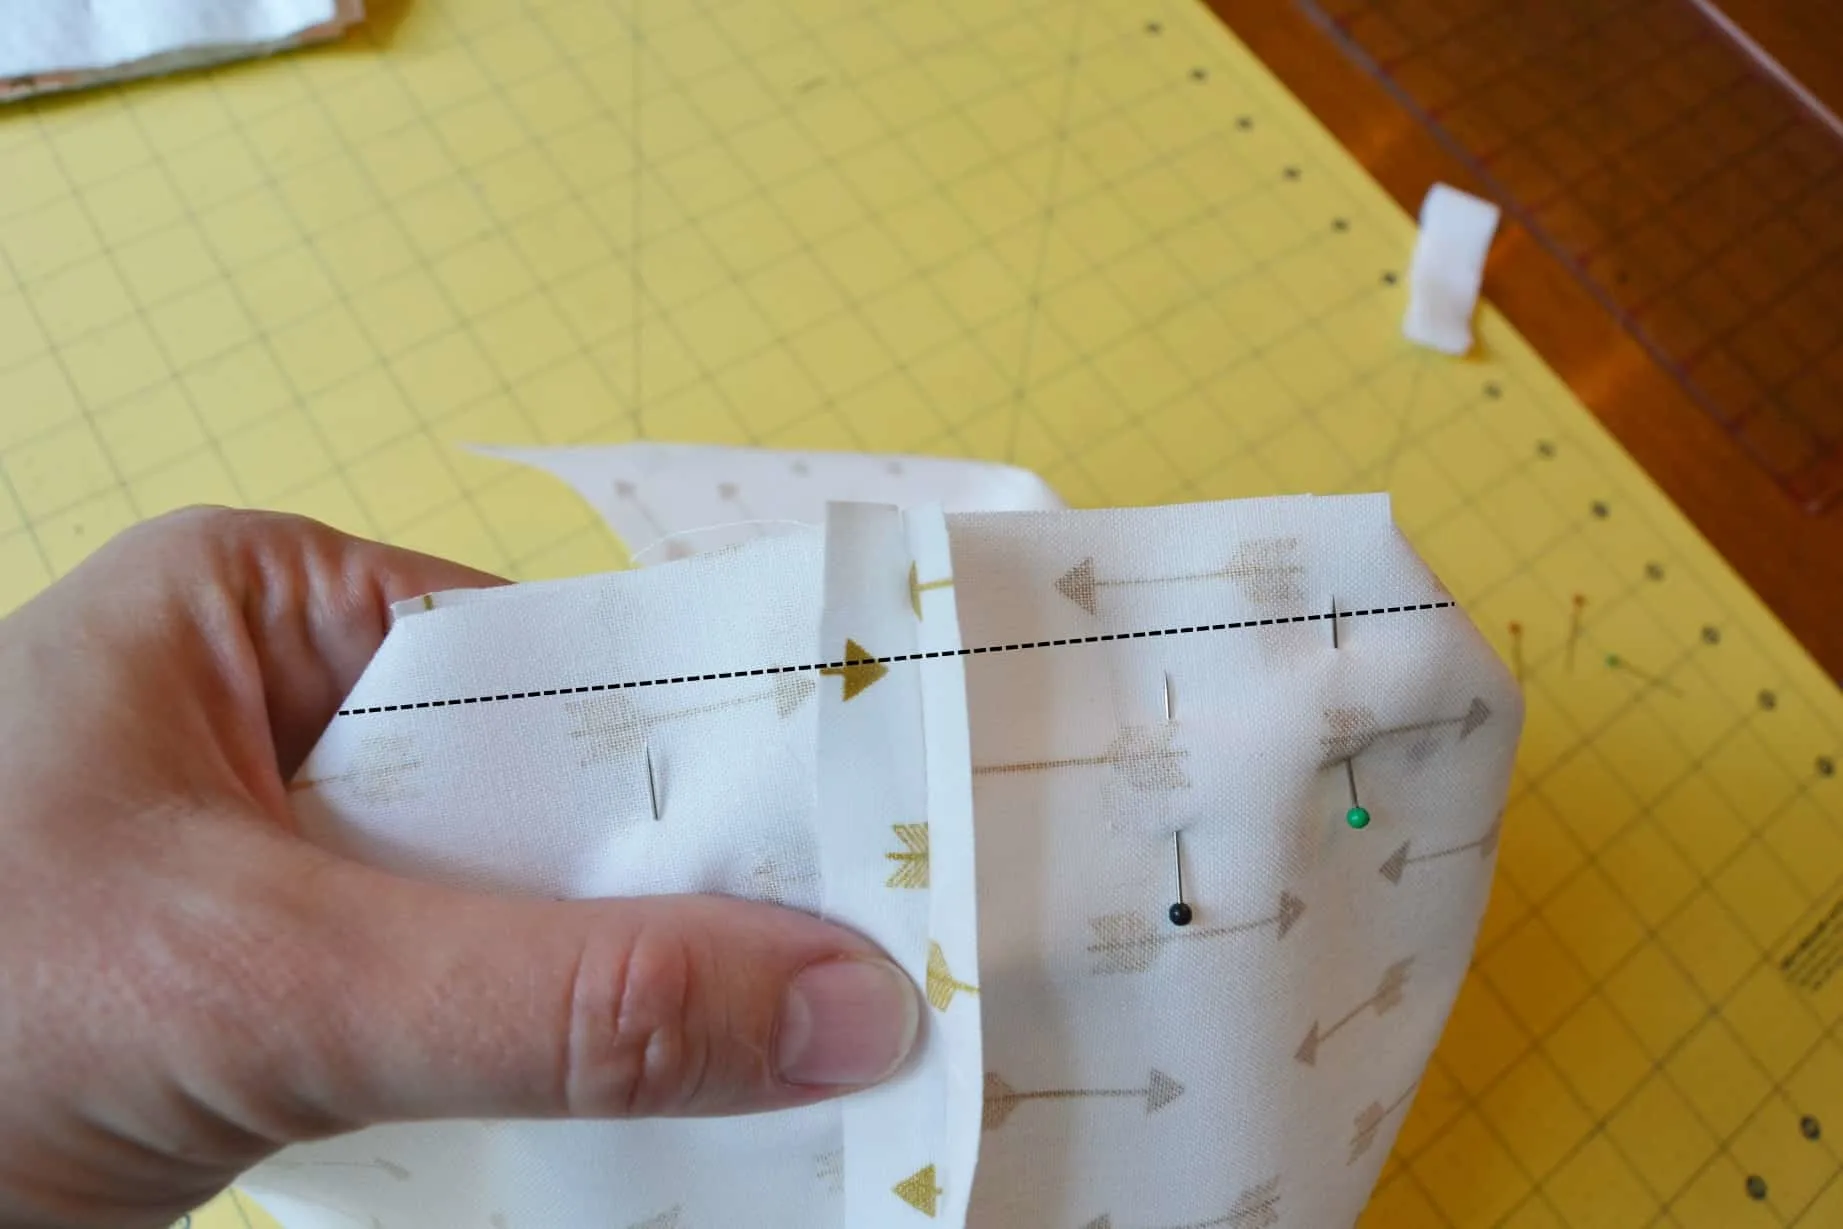
 Step 12: Line them up so that the top edges of both meet up. Pin them so that they stay in place and then sew around the top edge of the opening and the lid of the lunch bag. Around those rounded edges of the lid you’re going to want to clip the corners and trim any excess so that it will lay nicely when you turn it right side out.
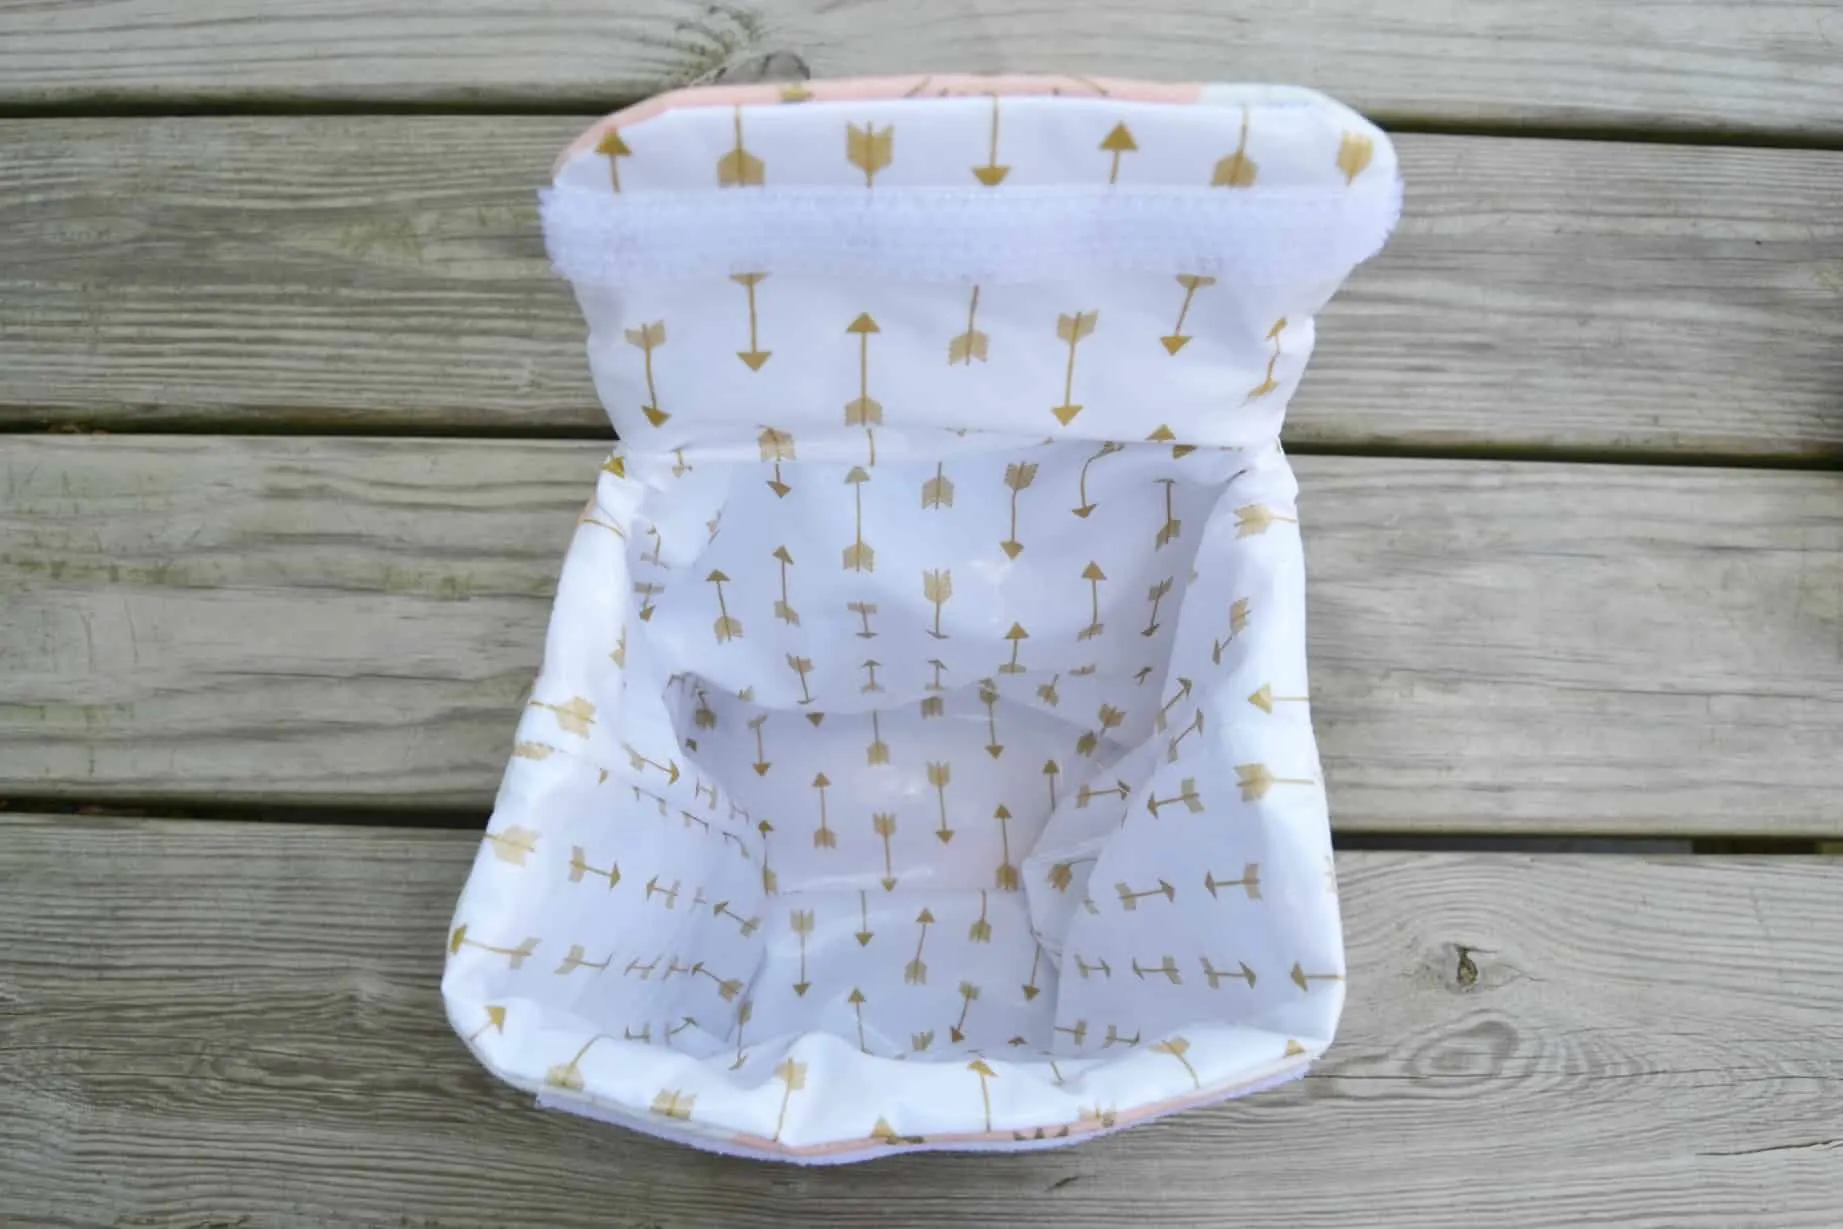
 Step 13: Use the hole that you left in the lining to turn it right side out. Sew the hole in the lining shut and stuff the lining into the inside. Press it a little on the outside of the bag just to help it get its shape and you’re done! Feel free to top stitch around the opening of the lunchbox and the lid if you want to, like I did for the firedog one.


Now you’ve made your own DIY lunch box! I’m sure your kid will love having a personalized lunch box.


Don’t forget to enter the sweepstakes and be sure to check out more inspiration to pack with.
kathy
Sunday 26th of August 2018
What is insulated batting? Is that like insulbrite?
Cat
Sunday 26th of August 2018
Yes, Insulbrite is a name brand of insulated batting. Kind of like Kleenex is a brand of facial tissue but some people just say Kleenex. :)
Shannon Molenburg
Monday 30th of July 2018
These are seriously so COOL! Would love to carry my big girl lunch to work in a tote like this!!!! I love the fabrics you selected too!
Cat
Monday 30th of July 2018
Thank you! I really love the swan one.