UPDATE: I’ve made a new baby bib pattern! I fattened the straps up a little bit which makes it easier to turn in step 5. You can use this old one or try the new bib pattern here.
When my boys were babies I went through a ton of bibs each day. I think that as a new mom you can’t have too many clean bibs on hand so I love to make a few as gifts for friends when they have babies. This week I was making some gifts and so now I’m sharing with you my baby bib pattern that I use along with a step by step tutorial for how to make your own bibs. 

With just a few simple supplies you can inexpensively make up a bunch of cute baby bibs that are personalized to the taste of the mama-to-be. This baby bib pattern is for younger babies, from newborn to about 4 months old.
You will need:
- fabric for the front of the bib
- fabric for the back of the bib (I like to use something absorbent, like terry cloth)
- thread
- sewing machine (unless you want to do it by hand)
- pins
- velcro or snaps to close the bib
- Snap Fastener tool if you elect to use snaps
- scissors or a rotary cutter and mat

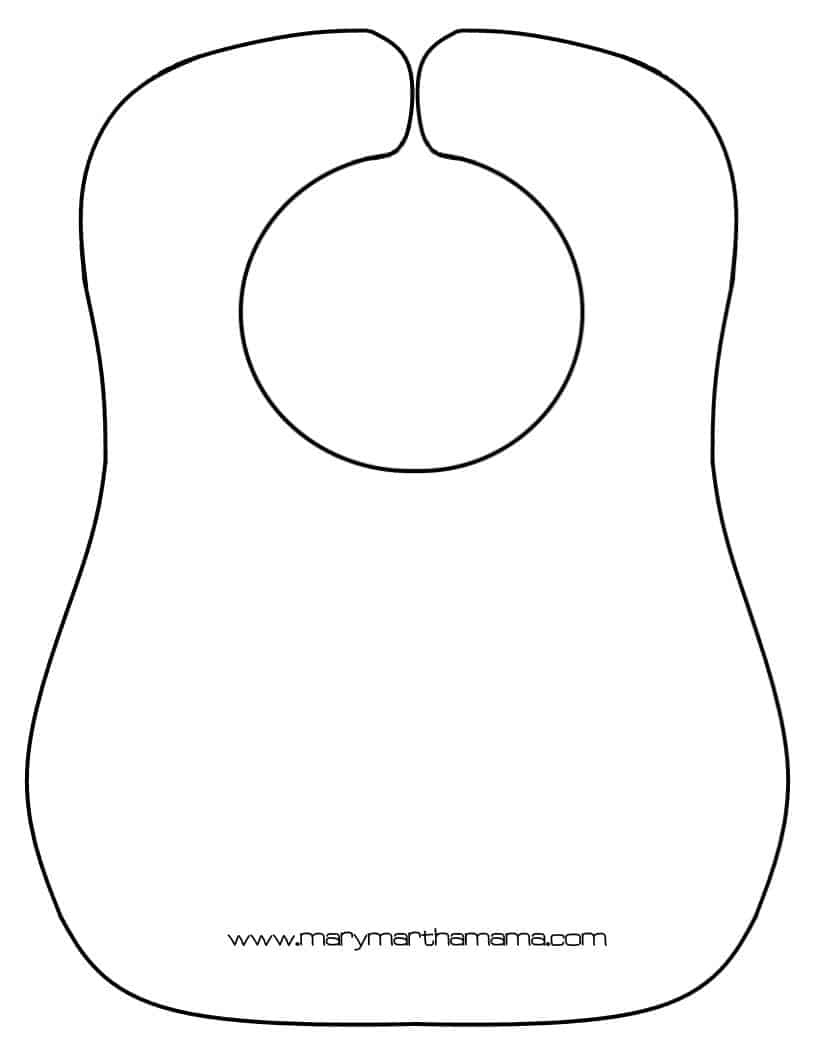
First up here is the Pattern that I use to make my bibs:
Video Tutorial
Baby Bib Pattern Tutorial
1.Print off the pattern and cut it out. Make sure you check your printer settings so that it prints full size. It should take up most of the page and look like the picture below:


2. Place your baby bib pattern on top of the fabric you want to use for your bib and cut around the edges. If you plan on using your bib pattern a lot you may want to laminate it.


3. Place your fabric that you want to use as the front of your bib face down on top of the fabric you plan to use for the back. Pin your fabric together and using your front fabric as a guide cut your backing fabric to match.


4. Sew around the edge of the bib but stop a few inches before you come back to where you began. You want to leave a small opening so that you can turn your bib right side out.
Where you want to leave the gap is up to you. I like to leave it at the top of the bib so that it’s a little less obvious but if you do it there just know that it makes turning the bib right side out a bit more difficult. It’s not impossible but it will require a little more work.


5. Turn the bib right side out. Iron it so that everything lays nice and flat.


6. Top stitch all the way around the outside of the bib.


7. Attach a way to close the bib. You can sew on velcro or you can attach snaps depending on your preference.
Personally I like snaps, but choose what you like. I attach the snaps using a fastener tool and a hammer.


Once you’ve attached your velcro or snaps you are all done! As with all baby accessories please wear the bibs with care—use only on a child under supervision and never leave one on a sleeping baby.
Baby Bib Pattern and Step by Step Tutorial


Use this free baby bib pattern to make some baby bibs quickly and easily.
Materials
- fabric for the front of the bib
- fabric for the back of the bib (I like to use something absorbent, like terry cloth)
- thread
- velcro or snaps to close the bib
Tools
- Snap Fastener tool if you elect to use snaps
- scissors or a rotary cutter and mat
- sewing machine (unless you want to do it by hand)
- pins
Instructions
- Print off the pattern and cut it out. Make sure you check your printer settings so that it prints full size. It should take up most of the page.
- Place your baby bib pattern on top of the fabric you want to use for your bib and cut around the edges. If you plan on using your bib pattern a lot you may want to laminate it.
- Place your fabric that you want to use as the front of your bib face down on top of the fabric you plan to use for the back. Pin your fabric together and using your front fabric as a guide cut your backing fabric to match.
- Sew around the edge of the bib but stop a few inches before you come back to where you began. You want to leave a small opening so that you can turn your bib right side out.Where you want to leave the gap is up to you. I like to leave it at the top of the bib so that it’s a little less obvious but if you do it there just know that it makes turning the bib right side out a bit more difficult. It’s not impossible but it will require a little more work.
- Turn the bib right side out. Iron it so that everything lays nice and flat.
- Top stitch all the way around the outside of the bib.
- Attach a way to close the bib. You can sew on velcro or you can attach snaps depending on your preference. Personally I like snaps, but choose what you like. I attach the snaps using a fastener tool and a hammer.
- Once you’ve attached your velcro or snaps you are all done! As with all baby accessories please wear the bibs with care—use only on a child under supervision and never leave one on a sleeping baby.
I like to make a few coordinating baby items so often times I make burp cloths and a blanket to complete a gift set. Figuring out a mom’s style and then being able to personalize some things to her taste is really the fun part of being able to make something handmade for the baby.
This go around I made a quilt that’s slightly different than the simple ones I usually make. I’ll be sharing the details on that next week.
Anyone else making any baby gifts? What do you like to give as a gift for a new baby?
Looking for more baby sewing projects? Check out my post on 14 Baby Gifts to Sew!


Rachel F.
Thursday 23rd of July 2015
This is so cute! And it looks simple enough for my sewing skills too. :) Thanks for this tutorial-I'm going to have to pin it for later.
Cat
Thursday 23rd of July 2015
Thank you! It really is simple so I'm sure you can handle it!